For Windows Laptops
1. How to Take Screenshot in Laptop Using PrtSc (Print Screen) Key
Step-by-step:
- Press the PrtSc (Print Screen) key on your keyboard.
- This captures the entire screen and copies it to the clipboard.
- Open an image editor (e.g., Paint or Word) and paste it by pressing Ctrl + V.
- Save the file wherever you like.
Why it’s useful: It’s quick and simple, and you can paste it into any application.
2. How to Take Screenshot in Laptop Using Windows + PrtSc
Step-by-step:
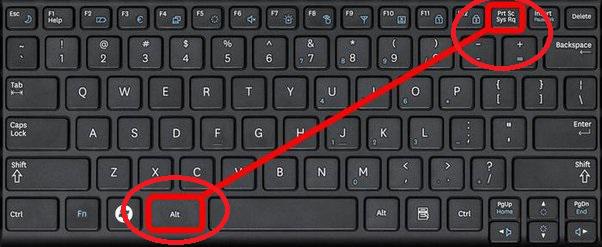
- Press Windows Key + PrtSc at the same time.
- The screen will dim briefly to show that the screenshot has been taken.
- The screenshot will automatically save in your Pictures > Screenshots folder.
Why it’s useful: It automatically saves the screenshot, so you don’t have to paste or edit it manually.
3. How to Take Screenshot in Laptop Using Windows + Shift + S (Snipping Tool)
Step-by-step:
- Press Windows + Shift + S together.
- Your screen will darken, and you’ll be able to select the area you want to capture by dragging the cursor.
- The screenshot is copied to the clipboard, and you can paste it into any app.
Why it’s useful: Offers a variety of capture modes (rectangle, freeform, or full screen) and is ideal for selective captures.
4. How to Take Screenshot in Laptop Using Snipping Tool (Windows)
Step-by-step:
- Open the Snipping Tool (type it in the Start menu search bar).
- Click on New and choose your capture type (freeform, rectangular, or window).
- Capture the screenshot, and save it as needed.
Why it’s useful: It offers more flexibility than the basic Print Screen function and allows for editing and saving screenshots in different formats.
5. How to Take Screenshot in Laptop Using Snip & Sketch Tool (Windows)

Step-by-step:
- Press Windows + Shift + S.
- After capturing a screenshot, click on the notification that appears to open it in Snip & Sketch.
- Edit and annotate your screenshot before saving or sharing it.
Why it’s useful: It’s a newer tool that offers easy editing and annotation features.
6. How to Take Screenshot in Laptop Using Alt + PrtSc (Capture Active Window)
Step-by-step:
- Press Alt + PrtSc.
- This will capture only the active window, not the whole screen.
- Paste it into an editor (like Paint) with Ctrl + V, then save it.
Why it’s useful: Ideal for capturing a single window rather than the whole screen.
7. How to Take Screenshot in Laptop Using Windows + G (Game Bar)
Step-by-step:
- Press Windows + G to open the Game Bar.
- Click the camera icon or press Windows + Alt + PrtSc to take a screenshot of your game or active window.
- The screenshot is saved in the Videos > Captures folder.
Why it’s useful: Designed for gamers, it lets you capture screenshots without interrupting your gaming session.
8. How to Take Screenshot in Laptop Using Game DVR (Windows 10)
Step-by-step:
- Press Windows + G to bring up the Game DVR.
- You can record gameplay or take screenshots by pressing Windows + Alt + PrtSc.
Why it’s useful: Game DVR captures both video and images, making it great for gaming and tutorials.
For Mac Laptops
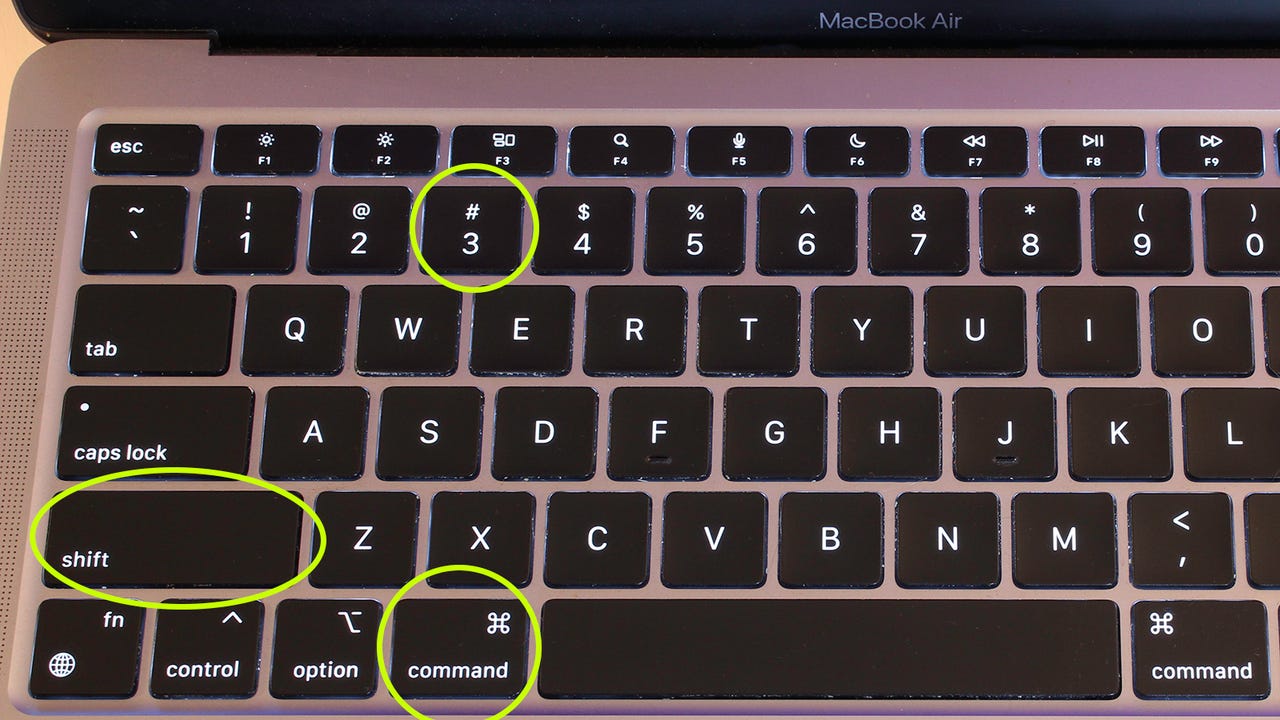
9. How to Take Screenshot in Laptop Using Command + Shift + 3 (Mac)
Step-by-step:
- Press Command + Shift + 3 to capture the full screen.
- The screenshot will automatically save to your desktop.
Why it’s useful: Quick and easy way to capture your entire screen.
10. How to Take Screenshot in Laptop Using Command + Shift + 4 (Mac)
Step-by-step:
- Press Command + Shift + 4 to change your cursor into a cross.
- Click and drag to select the area you want to capture.
- The screenshot is saved to your desktop.
Why it’s useful: Great for taking screenshots of a specific area of the screen.
11. How to Take Screenshot in Laptop Using Command + Shift + 4 + Spacebar (Mac)
Step-by-step:
- Press Command + Shift + 4 and then tap the Spacebar.
- The cursor will change to a camera. Click on any window to capture it.
- The screenshot will be saved to your desktop.
Why it’s useful: Perfect for capturing a specific window without having to crop it later.
12. How to Take Screenshot in Laptop Using Command + Shift + 5 (Mac)
Step-by-step:
- Press Command + Shift + 5 to bring up the screenshot toolbar.
- You can capture the entire screen, a selected window, or a selected portion of the screen.
- After the capture, the screenshot will be saved to your desktop.
Why it’s useful: It provides options for full-screen capture, region capture, or window capture.
13. How to Take Screenshot in Laptop Using Preview (Mac)
Step-by-step:
- Open Preview, go to File > Take Screenshot.
- Choose from From Selection, From Window, or From Entire Screen.
- Save the screenshot after it’s captured.
Why it’s useful: Gives you more options for capturing specific sections of your screen with no additional software needed.
14. How to Take Screenshot in Laptop Using Skitch (Mac)
Step-by-step:
- Download and install Skitch (free app).
- Launch the app and click Capture.
- Select the screen area you want to capture, annotate it, and save or share the screenshot.
Why it’s useful: It’s a quick way to capture and annotate screenshots on Mac.
For Linux Laptops
15. How to Take Screenshot in Laptop Using PrtSc (Print Screen) Key (Linux)
Step-by-step:
- Press PrtSc to capture the entire screen.
- The screenshot is copied to your clipboard, and you can paste it into any program (like GIMP or Paint).
Why it’s useful: Simple and easy to use for basic screen captures.
16. How to Take Screenshot in Laptop Using Shift + PrtSc (Linux)
Step-by-step:
- Press Shift + PrtSc to select a portion of the screen to capture.
- After selection, the screenshot is automatically saved to your Pictures folder.
Why it’s useful: It lets you capture only the area you need, saving time.
17. How to Take Screenshot in Laptop Using Alt + PrtSc (Linux)
Step-by-step:
- Press Alt + PrtSc to capture only the currently active window.
- The screenshot will be copied to your clipboard, ready to be pasted into an app.
Why it’s useful: Perfect for taking screenshots of a specific window rather than the entire screen.
18. How to Take Screenshot in Laptop Using Flameshot (Linux)
Step-by-step:
- Install Flameshot via your package manager (e.g., sudo apt install flameshot).
- Press PrtSc to capture the screen.
- Annotate or edit the screenshot directly before saving it.
Why it’s useful: Flameshot allows quick edits and annotations, which is ideal for work-related captures.
19. How to Take Screenshot in Laptop Using Shutter (Linux)
Step-by-step:
- Open the Shutter app.
- Choose the capture mode (full screen, window, or selected region).
- After the screenshot is captured, you can edit or save it.
Why it’s useful: Shutter allows more advanced editing and cropping before saving the image.
20. How to Take Screenshot in Laptop Using Spectacle (Linux)
Step-by-step:
- Open Spectacle (a KDE screenshot tool).
- Click on Capture and select the type of screenshot you want (full screen, window, or region).
- Save the screenshot once it’s captured.
Why it’s useful: Spectacle gives you several advanced options, including saving in different formats.
For Chromebook
21. How to Take Screenshot in Laptop Using Ctrl + Show Windows (Chromebook)
Step-by-step:
- Press Ctrl + Show Windows (F5) to take a full-screen screenshot.
- The screenshot is automatically saved to your Downloads folder.
Why it’s useful: It’s the simplest method for capturing a full-screen image.
22. How to Take Screenshot in Laptop Using Ctrl + Shift + Show Windows (Chromebook)
Step-by-step:
- Press Ctrl + Shift + Show Windows to select a region.
- Click and drag to capture the selected area.
- The screenshot is saved to your Downloads folder.
Why it’s useful: Ideal for taking screenshots of specific parts of the screen.
23. How to Take Screenshot in Laptop Using Nimbus Screenshot Extension (Chrome)
Step-by-step:
- Install the Nimbus Screenshot Chrome extension.
- Click the extension icon and select Capture Area or Full Page.
- Save or edit the screenshot directly within the extension.
Why it’s useful: It can capture an entire webpage, including areas not visible on the screen.
Third-Party Tools for All Systems
24. How to Take Screenshot in Laptop Using Lightshot (All Systems)
Step-by-step:
- Install Lightshot on your laptop (available for both Windows and Mac).
- Press the PrtSc key, then drag to select the region you want to capture.
- You can then annotate, share, or save the screenshot.
Why it’s useful: Lightshot offers instant editing and sharing options.
25. How to Take Screenshot in Laptop Using SnagIt (All Systems)
Step-by-step:
- Download and install SnagIt.
- Use the Capture option to select the area of your screen.
- After capturing, SnagIt allows you to edit and annotate the screenshot.
Why it’s useful: SnagIt provides advanced features like screen recording and editing tools.
26. How to Take Screenshot in Laptop Using Greenshot (Windows)
Step-by-step:
- Install Greenshot.
- Use the shortcut keys to capture full-screen or region-based screenshots.
- Edit or annotate the screenshot before saving it.
Why it’s useful: It’s lightweight and includes a variety of useful editing options.
27. How to Take Screenshot in Laptop Using FastStone Capture (Windows)
Step-by-step:
- Install FastStone Capture.
- Capture full screen, active windows, or custom regions.
- Use the built-in editor to enhance the image before saving.
Why it’s useful: It includes powerful editing tools and is suitable for professional use.
28. How to Take Screenshot in Laptop Using TinyTake (Windows/Mac)
Step-by-step:
- Download and install TinyTake.
- Use the Capture feature to grab full-screen, window-based, or selected area screenshots.
- Edit and share your screenshots via the app.
Why it’s useful: It integrates well with cloud storage services and provides an easy way to share images instantly.
29. How to Take Screenshot in Laptop Using ShareX (Windows)
Step-by-step:
- Download ShareX.
- Choose a screenshot capture method (full screen, active window, or region).
- After capturing, you can instantly edit or upload the screenshot.
Why it’s useful: ShareX is a free, open-source tool with advanced features for professionals.
30. How to Take Screenshot in Laptop Using Skitch (Mac)
Step-by-step:
- Download Skitch.
- Select the area or window to capture, then annotate the screenshot.
- Save the image or share it directly.
Why it’s useful: Skitch is perfect for quickly annotating screenshots before sharing them.








Leave a Reply